Category Archives: Woodworking

Fall fell, or did it?

What crazy weather we have been having the last month or so. The daily high temps could have been anywhere from 60 to 100! Now it seems the weather is shifting into the more normal fal pattern, and we sure could use it. I believe we are at the bottom of the medium drought cycle and on the recovery side of the long cycle, but who really knows these days. The weather models have been “adjusted” so many times lately I don’t think anyone really has a handle on the changing patterns.

20150920_141131Besides all the weather stuff… I had posted about all of the seasonal movies in our que, promptly after making that post and settling in for some movie time, the TV let some of the magic out. It appears that it was just the internal power transformer but I have been playing hobb trying to get parts, so we ended up getting a new set so I can spend some more time on the repair. Best laid plans I suppose. I will post a follow up on the movie list later as well as a follow up on the TV progress.

BTW: When selecting a new TV, or any consumer electronics for that matter, make sure you buy a real name brand, Sony, Magnavox, Samsung, etc., someone who has a large product line and has been around for a while. Someone with a reputation to be concerned with and a supply chain that requires conformity. If you want to give an off-brand or small-house product a go, make sure you can get service documentation (schematics, diagrams, parts lists, troubleshooting tips) before you buy, and hang on to it. You or your repair person may need it.

Apex Digital is a crap manufacturer and documentation on their products is basically unavailable. Parts are also unavailable unless salvaged off of used boards, and even then are a crap-shoot. Within the same model I have found numerous incompatible parts changes, and no one can get component parts. Very few sources can even get board level replacements.

20151001_105529
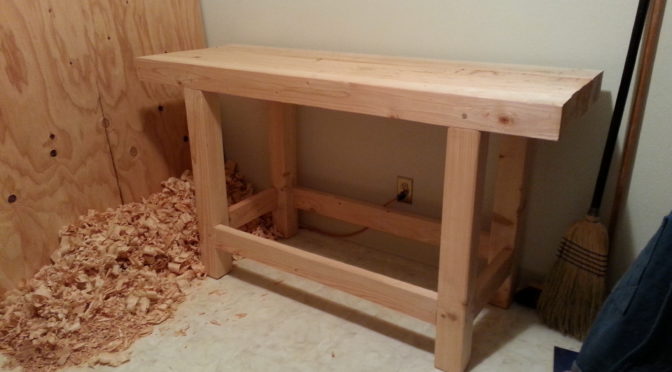
Moving along, I have been busy with woodworking projects for work. I have been wanting to build an built-in rent-drop for years. We started out with a basket on the wall inside the mail slot then progressed to putting a bookcase/cabinet in front of the slot with a hole cut out of the back and a basket on a shelf. After almost 20 years I finally got to destroy the bookcase/cabinets I hated build this built-in fixture. So far we are very happy with the results.

Along with the day-job stuff we have been working a some other projects that necessitated buying a few tools. Gee darn, I hate buying tools. The first two are a dapping block and a disc punch cutter. These have been on my list of jewelry tools for many years, I just never could justify them. With our current project list there are several items that need these tools. Some are jewelry related and some are for hardware and findings. Another tool I have been coveting for a very long time is a rolling mill. This one was a bit pricy but I found a deal for about a third of the usual cost. We both decided that was the Universe saying it’s time to add this tool to the round up.

20150923_151037 20150923_152328   20150926_153006

20150922_165018While I was at it I managed to make another tool I have been waiting on for no apparent reason, a jeweler’s fork, or as it is more commonly known, a bench pin. I’m not sure why I waited so long to make one, but here it is.

After getting the tools in place I worked on a few test projects and was reasonably happy with the results. Two copper rings, one with an aircraft rivet, a copper button, and a practice go at a cross-peened leaf which is a component to something as of yet undecided.

I like working copper, particularly recovered/recycled copper. There is so much you can do with it. The leaf and solid ring were made from old copper pipe, the riveted one was made from some salvage electrical wire, and the button was made from some fourth-hand scrap copper sheet.
20150926_161820  20150926_175131  20150926_180034  20150923_160508

While in the groove I also “recovered” some tool steel from some old screwdrivers and annealed them so I can turn them into some jewelry tools before re-hardening and tempering them. Another simple tool build was a pack of sanding sticks.

20150928_154905  20150928_144844

The last thing on the list is my continued studies for my Commercial Radio Tech license. I passed on of the three a couple of weeks ago and plan on taking the big one next week. I will follow up with the third, which is for an endorsement, later on in the month.

That’s it for now, until next time,
~FlyBoyJon

Interests In Phase

My last post was full of projects I have been working on all year, an annual wrap-up as it were. If you payed only slight attention to the post you would probably notice that nearly all of the projects were woodworking projects. If you went back to posts and social media of late 2013 and early 2014 you would find that most references were to amateur radio, go back a little further and there was a nearly three-year stretch of mostly aviation mechanic stuff.

What does it all mean? Does this guy flit around from interest to interest and never finish anything or stick with anything? No, and yet sort of.

When you have a wide range of interests it is difficult to work within the scope of all of them at once. Often times projects will spur interest or rekindle interests never pursued when they encompass something “new.” Take radio for example. I have been doing radio stuff since the early 80s. I was into CB back then and later with Search and Rescue that continued. When working in towing I did a lot of auto-electric and radio work. One of the things that got me into CB was a desire to work short wave. What brought radio back into phase for me was aviation.

My personal interests in aviation mechanicing are widely separated, and at the same time not so divergent. My greatest personal interest is in restoration of early aircraft, around 1910-1930. In the latter part of this radio was just making it into aircraft. To work on radios in aviation you need an FCC General Radio Operator License (GROL) as well as FAA approval. As an A&P student I found that while the FAA mandated curriculum lags behind current technology (some stuff from the 40s is still required knowledge) it is still much further ahead of the period I am interested in.

Beyond my personal interests, I need to be marketable as a mechanic to get a job. An A&P mechanic with an FCC GROL with a RADAR endorsement seems to have an advantage to me. To get the commercial licenses it made sence to get an education on the subject matter. I had just finished two years of A&P school and the thought of starting a new major and taking on more student loans seemed like a bad idea. Re-enter amateur radio. Now, 30 years after my initial desire to get  a ham license, I have my Amateur Extra Class license. 

Woodworking also ties into this mix. Hams don’t just talk on the radio, they build them. They build structures to contain them, they build a lot of stuff. Well, some do anyway. It wasn’t just radio that pushed me further into my woodworking zone though.

Back in the early 90s I rebuild my great-uncles house after he passed away. I have been doing odd construction related stuff for years but this was my first big project. I had to learn a lot before starting various trade work, and I did learn a lot and I have put it to good use over the last few decades. I like wood working and construction, it is very satisfying.

So with this back ground of making stuff building my own airplane seemed like a good idea. Many of the early aircraft were wood structures. Even the largest airplane ever built, the Spruce Goose was a wood structure airplane. This is how woodworking got me into aviation maintenance.

By now I bet a few things are clear and some are clear as mud. All of my interests tie together, somehow. Even homesteading ties to my interests. Some more obvious than others.

So, back to interests in phase. The desire to work on projects in various areas of interest all the time is always there. The needs of the time dictate what specific areas need the most attention at that moment. I can keep a few things floating at a time but not everything.

One of my current goals is to do stuff from various interests more often, mix them up a little more.  I have a tendency to go all-in when phase shifts and one skill becomes more timely than the others. Subsequently, it looks like I’m often distracted by another shiny. If I am truly honest with myself there is a degree of truth to being distracted. Fortunately it is distraction by a subject/project/research that I most likely would have ended up doing anyway.

~FlyBoyJon/KK6GXG/A&P/…

CW Oscillator

The shack/radio bench is rapidly evolving. I have been working on several radio projects, most of which have been relatively small. The most recent project is a CW (Morse Code) practice oscillator. It allows me to practice sending code while I learn.

I had built a transistor based oscillator which worked okay but the tone wasn’t that stable, or loud enough to be that useful. I had a drawn up a simple transistor amplifier that I planned on adding to the circuit board, but the design is still less that optimal from a stability standpoint
After building the transistor version I decided to try an IC (integrated circuit) based oscillator. The tone quality, stability, and volume are much better than the transistor type. I built the oscillator on a breadboard to test the circuit out and make sure everything was in working order.

After checking everything out I started laying it out on paper the way I would actually wire it all together on a proto-board.

Everything worked great so I was ready to get to the next phase of the project, building the housing for the whole thing
The plan for the case was to build a wooden box with as much of a vintage (read steampunkish) look to it so it was time to move operations from the shack/radio bench down to the workshop.

First up was to design a basic box. I chose Douglas fir for the frame pieces and mahogany plywood for the panels.

Since I was going for the steampunk look, brass, lots of brass. Everything was stuff I had around the shop so there was no waiting. More importantly, I have lots of the stuff so I can experiment a little.


The box was all hand cut and assembled. Everything is held together with glue though I did use brass pin nails for accent. The brass speaker grill doubles as a retainer for the analog acoustic speaker. I didn’t want to use the cheap plastic one in the project. The sound just isn’t the same as the paper speaker.

The other end panel was going to just be wood and nails, but I decided to go with an accent that would double as a way to open the panel. This panel needs to be removable because the battery is on this end. I went with a key hole on a whim, it just looked right. It was a bugger to hand file the whole plate but I think it’s worth it.
The box took two days to plan, cut out all of the materials and to assemble. The brass work was done the second day as well. It took a third day to apply the several coats of linseed oil that I used for the finish.

Once the box was all done and the finish was dried it was time, on the fourth day now, to plan out exactly how I was going to install the guts.

I know this was not a very thoroughly planned project. I planned out the electronics pretty well, but the case, well that was very much an on-the-fly thing.

Any way, back to the timeline, with all of the case work done it was time to relocate back to the shack.
Back in the shack I worked out the bugs in case design, well, I developed the work-arounds for the issues that arose from the case design. What can I say, one of the reasons I am doing this project is for a learning experience and I have learned a few things about project design, and project housing design in particular.

There are several things I would do differently if I were to do this project again. One would be to reconsider trying to stick mostly with hand tools. I could have saved myself a ton of time had I built the frame using my router.
I could have routed a single channel strip on the router and just cut the pieces and mitered it all together.

Another change would be to use tiny screws to hold the panels in. I would have had much better access while installing the guts.

As they say, hindsight is 20/20. Lessons well learned and worth learning.

Below is a short video of the oscillator in operation.

Until next time,
~FlyBoyJon

I’m a multi-bench kind of guy

20140317_142358While I was in A&P school almost everything I posted was, of course, aviation related. Since I graduated a lot of my time has been spent working with wood. One of the biggest projects, literally, was a new woodworking bench using traditional joinery and oak draw-bore pegs to tightly secure it all together. (later I added a crochet at the left front that was attached with 2 lag bolts which constitute all of the metal on the bench)

But wood isn’t everything. Back in October I took my first Amature Radio license test and earned my Technician class license, last month I took the General class exam and earned my General class license. I’m used to doing computer hardware work and in the past I did a little electronics work so I was familiar with some of the stuff involved in radio, but not a lot.

20140518_130113Back in the 80s I was into CB radio. Later in life when I was working in the towing industry I did a lot of electrical work on our tow trucks which included the radios, and of course, installing my own car stereos since I could drive. These other activities made me a little familiar with Ham radio, but only in a very cursory way. What pushed me to finally do what I had wanted to do for decades was learning more about aircraft radios in A&P school.

Now my “electronics bench” is shifting from computers to radio. I have some basic electrical diagnostic tools and a full compliment of basic hand tools, but I am lacking in some of the basic radio diagnostics and bench-tools. As with woodworking and other trades, what better place to cut your teeth than making some of your own tools.

Dummy Load
Dummy Load

This week on my radio projects list I had one bench tool, a dummy load. For those who may not know, a dummy load is what you would connect a radio transmitter to, instead of an antenna, to conduct a variety of bench tests, usually power output related. Not having a load while transmitting, an antenna or dummy attached, a radio can burn out; basically you are generating a lot of “power” but not giving it anywhere to go. While testing you don’t want to connect an antenna because you would be transmitting all of your tests on-air wasting air-time and occupying a frequency someone else could be using for communication.

So thats why a dummy load, now for the what. A dummy load is used to dissipate RF energy, that would otherwise be radiating from an antenna as radio waves. The load can be dissipated through a resistive material as heat instead of radio signals.

20140430_131228An easy way to accomplish this is to use a resistor with relatively low resistance and that can also handle high power loads. Another criteria is that it shouldn’t radiate, or leak, spurious signals.

That last part becomes tricky because you can’t use resistors that are made from coiled wire, normally the kind used in high power applications because the coils inside the resistors will generate inductive fields. Another more practical way is to use a bunch of lower wattage resistors in parallel so the wattage is accumulated and the resistance kept low.

A trick that can be used to help in the dissipation of heat from the resistors is to submerge the resistor package in a fluid medium that will help dissipate the heat generated by the resistors making them more efficient. The trick with this is to use a medium that has a high flash point so you don’t accidentally start a fire. This is called a “wet dummy load.” It is recommended that transformer oil is used; this is what utility companies use for the same purpose in their large power transformers. Unfortunately this stuff is very expensive. The last time I checked it was $2,300 for a 55 gal drum, about $42 a gallon if you could find it in anything less than 5 gallons. Fortunately there is an alternate, mineral oil, which is pretty close.

So what’s in store next you may ask… A field strength meter is on the list for next week. With any luck I will be able to get out and do some shopping for that project in the next day or two.

That’s all for now, and 73
~FlyBoyJon / KK6GXG

Milling Lumber

Greetings Tool Users,

Anyone out there familiar with milling? For those not familiar with the subject, milling is basically cutting wood down to specific measurements, making boards from logs as it were. This is an over simplification, but it, pardon the pun, cuts to the chase.

The project I am working on now is an all-wood airplane; that means all of the structural components are going to be milled lumber, except for the plywood. All of the materials can be purchased from a supplier pre-milled to specifications, but that would likely triple the cost of the materials, not to mention the freight charges from a shop that is not close by. What’s a craftsman to do? Mill lumber sourced locally, of course.

In most cases lumber here in the U.S. comes in “standard” sizes. These sizes originally were at one time the actual dimensions. A 2″x4″ (two-by-four) was actually two inches by four inches. Now-a-days a 2″x4″ is cut to 1-1/2″ x 3-1/2″. This can make it tough for a guy working on a project that requires “nominal” or actual dimensions, let’s say something like an aviation project.

I spent much of yesterday out-and-about looking for lumber for my project. As you might guess aviation has its own standards for materials, and wood products are no exception. Adding the term Aviation Grade significantly adds to the cost, too. In an attempt to cut down on some of the costs in buying my aviation grade lumber I am going to end up doing a lot of milling.

This is where milling yourself comes into play. Buying lumber at a slightly larger size and cutting it down to the size needed. Producing a high quality material involves cutting the lumber down to about 1/8 of an inch larger than needed in each dimension with a table saw, then using a plane, or planer, shave off the remaining material one side at a time. This can be time consuming because you are shaving off about 1/32 of an inch with each pass and you need to be careful to plane to the exact dimension you want. There is a lot of measuring, checking, and more measuring as you go. That extra 1/8 inch is going to take two to four passes on each of the four sides, one or two sides at a time depending on the planer you have. Planers can also be very dangerous. They have razor sharp blades spinning at high speeds on heavy steel spindles. Be sure to keep your hands well clear of the openings; these tools can do a lot of damage if you don’t treat them with a great deal of respect. That being said, they are great tools to have around.

In case you haven’t noticed, my aviation projects are going to bleed over into this tool blog on occasion. I have a blog specifically for the aviation stuff, but it makes sense to post about the tools, tooling, repair and techniques here. I will do my best to keep the aviation jargon and chatter over there and focus on the tool stuff here.

Coming up in the next few weeks I will cover a variety of woodworking subjects relating to working with milled lumber and smaller projects. One of the things I will need to do is duplicate a layout several times so it will involve jigging, jig building, and some other duplication tricks.

Until then,
~Dad